


The T and The T Area
Introduction
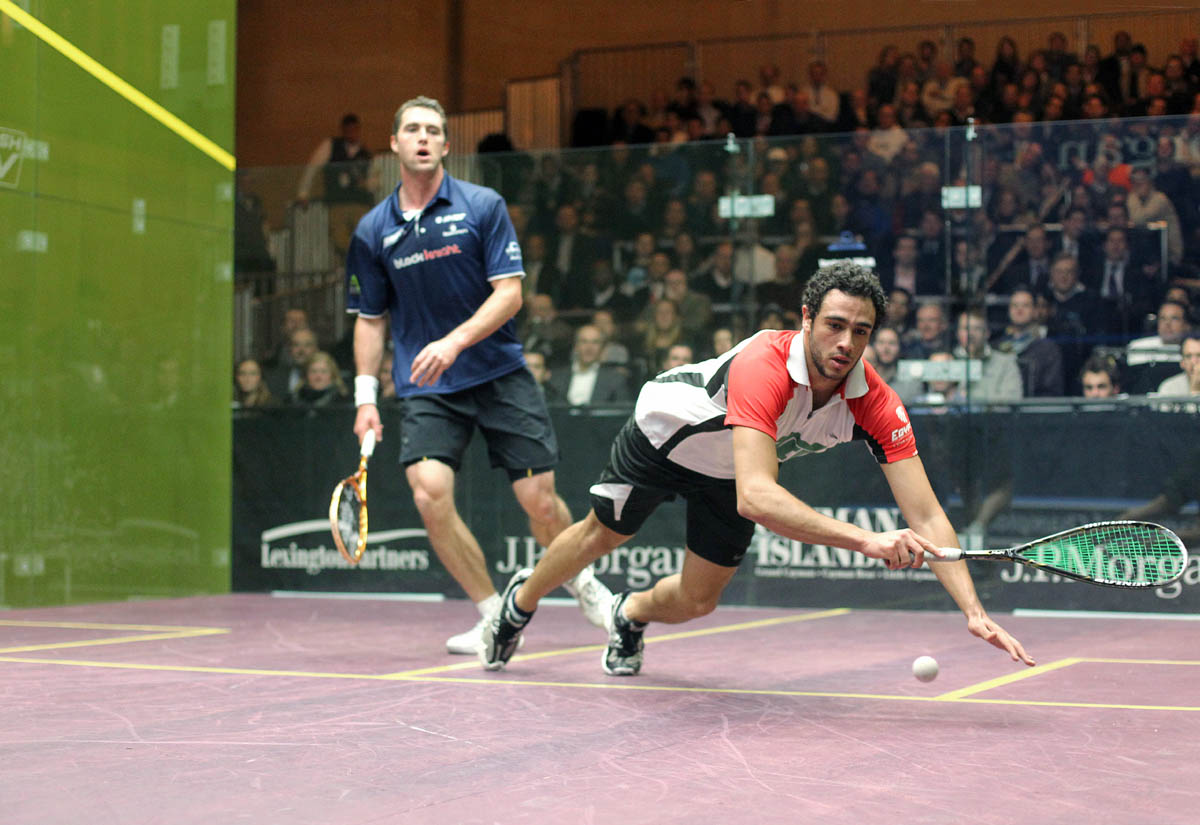
Returning to The T is generic to squash. The term "The T" is used. The player must be balanced ready to react. The actual position the player returns to is dependant on two aspects.
Firstly, whether the opponent is restricted. When the opponent is restricted the opponent may be forced to; boast, re-drop either straight or cross court, lob either straight or cross court and even drive the ball either side. Thus, the player can anticipate where the ball is going and accordingly positions at The T.
Secondly, if the opponent is not restricted (has a choice of shots) then the player's position at The T is dependent on where the opponent is positioned. When the player is unsure if the opponent is restricted the player should assume the opponent is not restricted.
The T
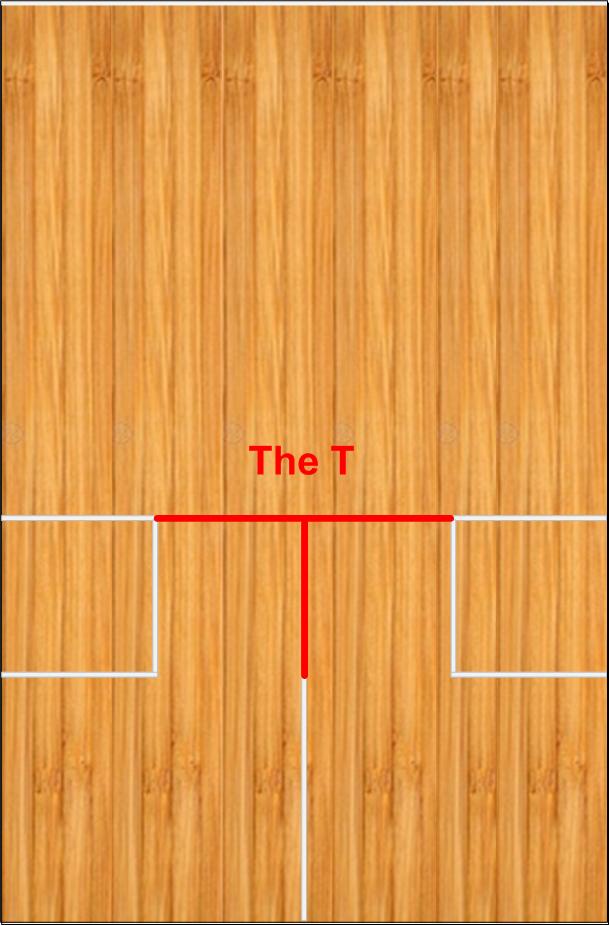
The T Positioning relevant to The T
Diagram coming...
The opponent outside T Area
The different T positions the player attains at The T providing the player's opponent has a choice of shots.
Back Of The T (the term used)
The Correct Positioning (relevant to The T)
Back Of The T
Where the player is positioned when the opponent is positioned in either of the back corners (D1&D2) or in either of near the back corners (G1&G2).
Prior to the opponent hitting the ball the player is positioned Back Of The T. This is subject to where the opponent is positioned.
The rationale being that because the opponent is positioned in either of the back corners (D1&D2) or in either of near the back corners (G1&G2), the player has maximum or more time to react.
Near The Back Of The T (the term used)
The Correct Positioning (relevant to The T)
Near The Back Of The T
Where the player is positioned when the opponent is positioned just inside the back half of the A1 Zone. When the opponent is positioned just inside the back half of the A1 Zone the player is positioned slightly in front of the opponent.
The rationale being that this encourages your opponent to drive the ball which is easier to retrieve than the short shot if the player was positioned level or behind the opponent.
Near The Front Of The T (the term used)
The Correct Positioning (relevant to The T)
Near The Front Of The T
Where the player is positioned when the opponent is positioned slightly further forward inside the back half of the A1 Zone. When the opponent is positioned slightly further forward in the back half of the A1 Zone again the player is positioned slightly in front of the opponent.
The rationale being that this encourages the opponent to drive the ball which is easier to retrieve than the short shot if the player was positioned level or behind the opponent.
On The Front Of The T (the term used)
Correct Positioning (relevant to The T)
The player should be positioned On The Front Of The T is dependent on where the opponent is positioned. If the opponent is positioned either just inside or outside of the short line or on the short line the player must be positioned On The Front Of The T (correct position).
On The Front Of The T
Where the player is positioned when the opponent is positioned either extremely forward in the back half of the A1 Zone or is positioned just inside the front half of the A1 Zone. When the opponent is positioned either extremely forward in the back half of the A1 Zone or is positioned just inside the front half of the A1 Zone the player positions On The Front Of The T slightly in front or slightly behind of the opponent, respectively.
The rationale being when the opponent is extremely forward in the back half of the A1 Zone that this still encourages the opponent to drive the ball. Although, not ideal, if the player was positioned level or behind the opponent the short shot would be extremely difficult to retrieve.
Similarily, the rationale being when the opponent is positioned just inside the front half of the A1 Zone that this neither tries to encourage or discourage the opponent to drive the ball. Although, not ideal, if the player was positioned level or in front of the opponent the drive would be extremely difficult to retrieve.
However, often the player does not only position on The T but also in the area around The T referred to as The T Area (see diagrams below).
The T Area for the Elite Player (T Zone)
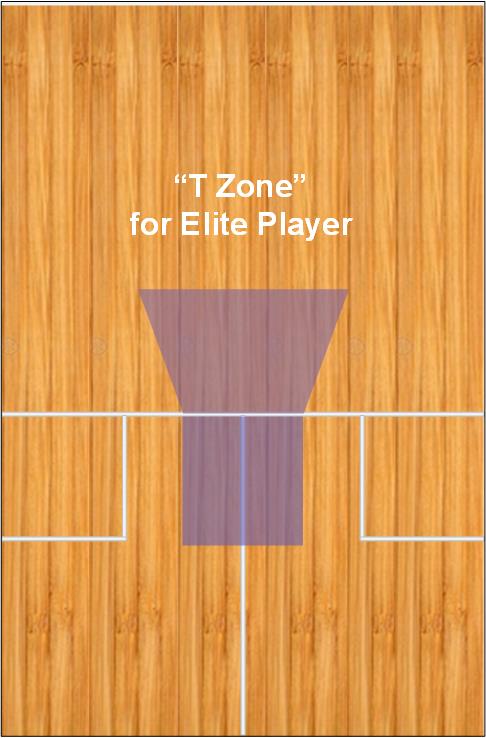
This is The T Area for elite player as the player can position further forward when the opponent is in the front corners. That is, the elite player has the ability to retrieve the short ball and the drive.
The T Area for the Club Player (T Zone)
The area on the front side of the short line is not as great.
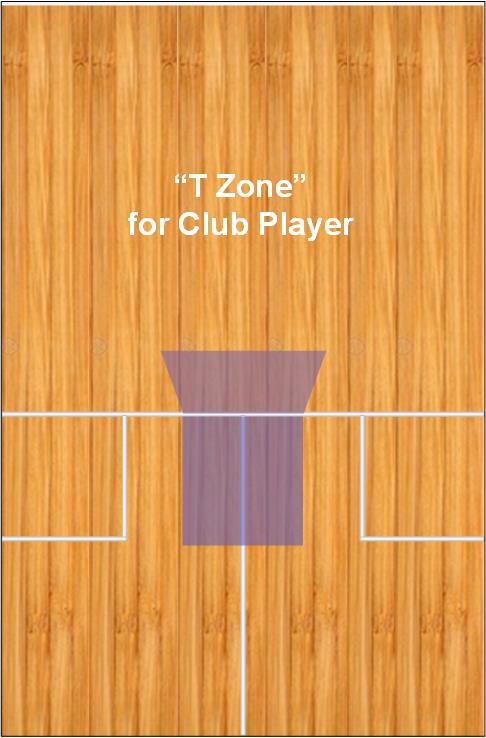
The club player is not as athletic as the elite player and consequently, positions further back when the opponent is in the front corners. That is, the club player sacrifices not retrieving some short shots in preference to retrieving the drive.
The T Area and The T Positioning
The different T Area and T positions the player attains providing the opponent has a choice of shot.
Near The Front Of The T (the term used)
The Correct Positioning (relevant to the front T Area and The T)
Where the player is positioned when the opponent is positioned in any of the following, either just inside the front half of the A1, in the G3, D3, G4 and D4 Zones.
Near The Front Of The T
Where the player is positioned when the opponent is positioned in any of the following, either just inside the front half of the A1, in the G3, D3, G4 and D4 Zones. When the opponent is positioned in any of the following, either just inside the front half of the A1, in the G3, D3, G4 and D4 Zones the player continues to position further forward, respectively.
The rationale being when the opponent continues to move further forward even into the D3 and D4 zones, although not ideal to retrieve the drive, the player must also continue to move forward otherwise the drop shot cannot be retrieved.
On The Front Of The T - Too High on the T
Incorrect positioning (Cons)
if the opponent is positioned in either the D1 or D2 Zones (and the swing is not restricted) the player must not be positioned on the T (incorrect position) otherwise the player will have difficulty intercepting the ball.
Examples
When the opponent is positioned at the back in the D1 Zone and the player is positioned On The Front Of The T the player is unable to intercept the ball.
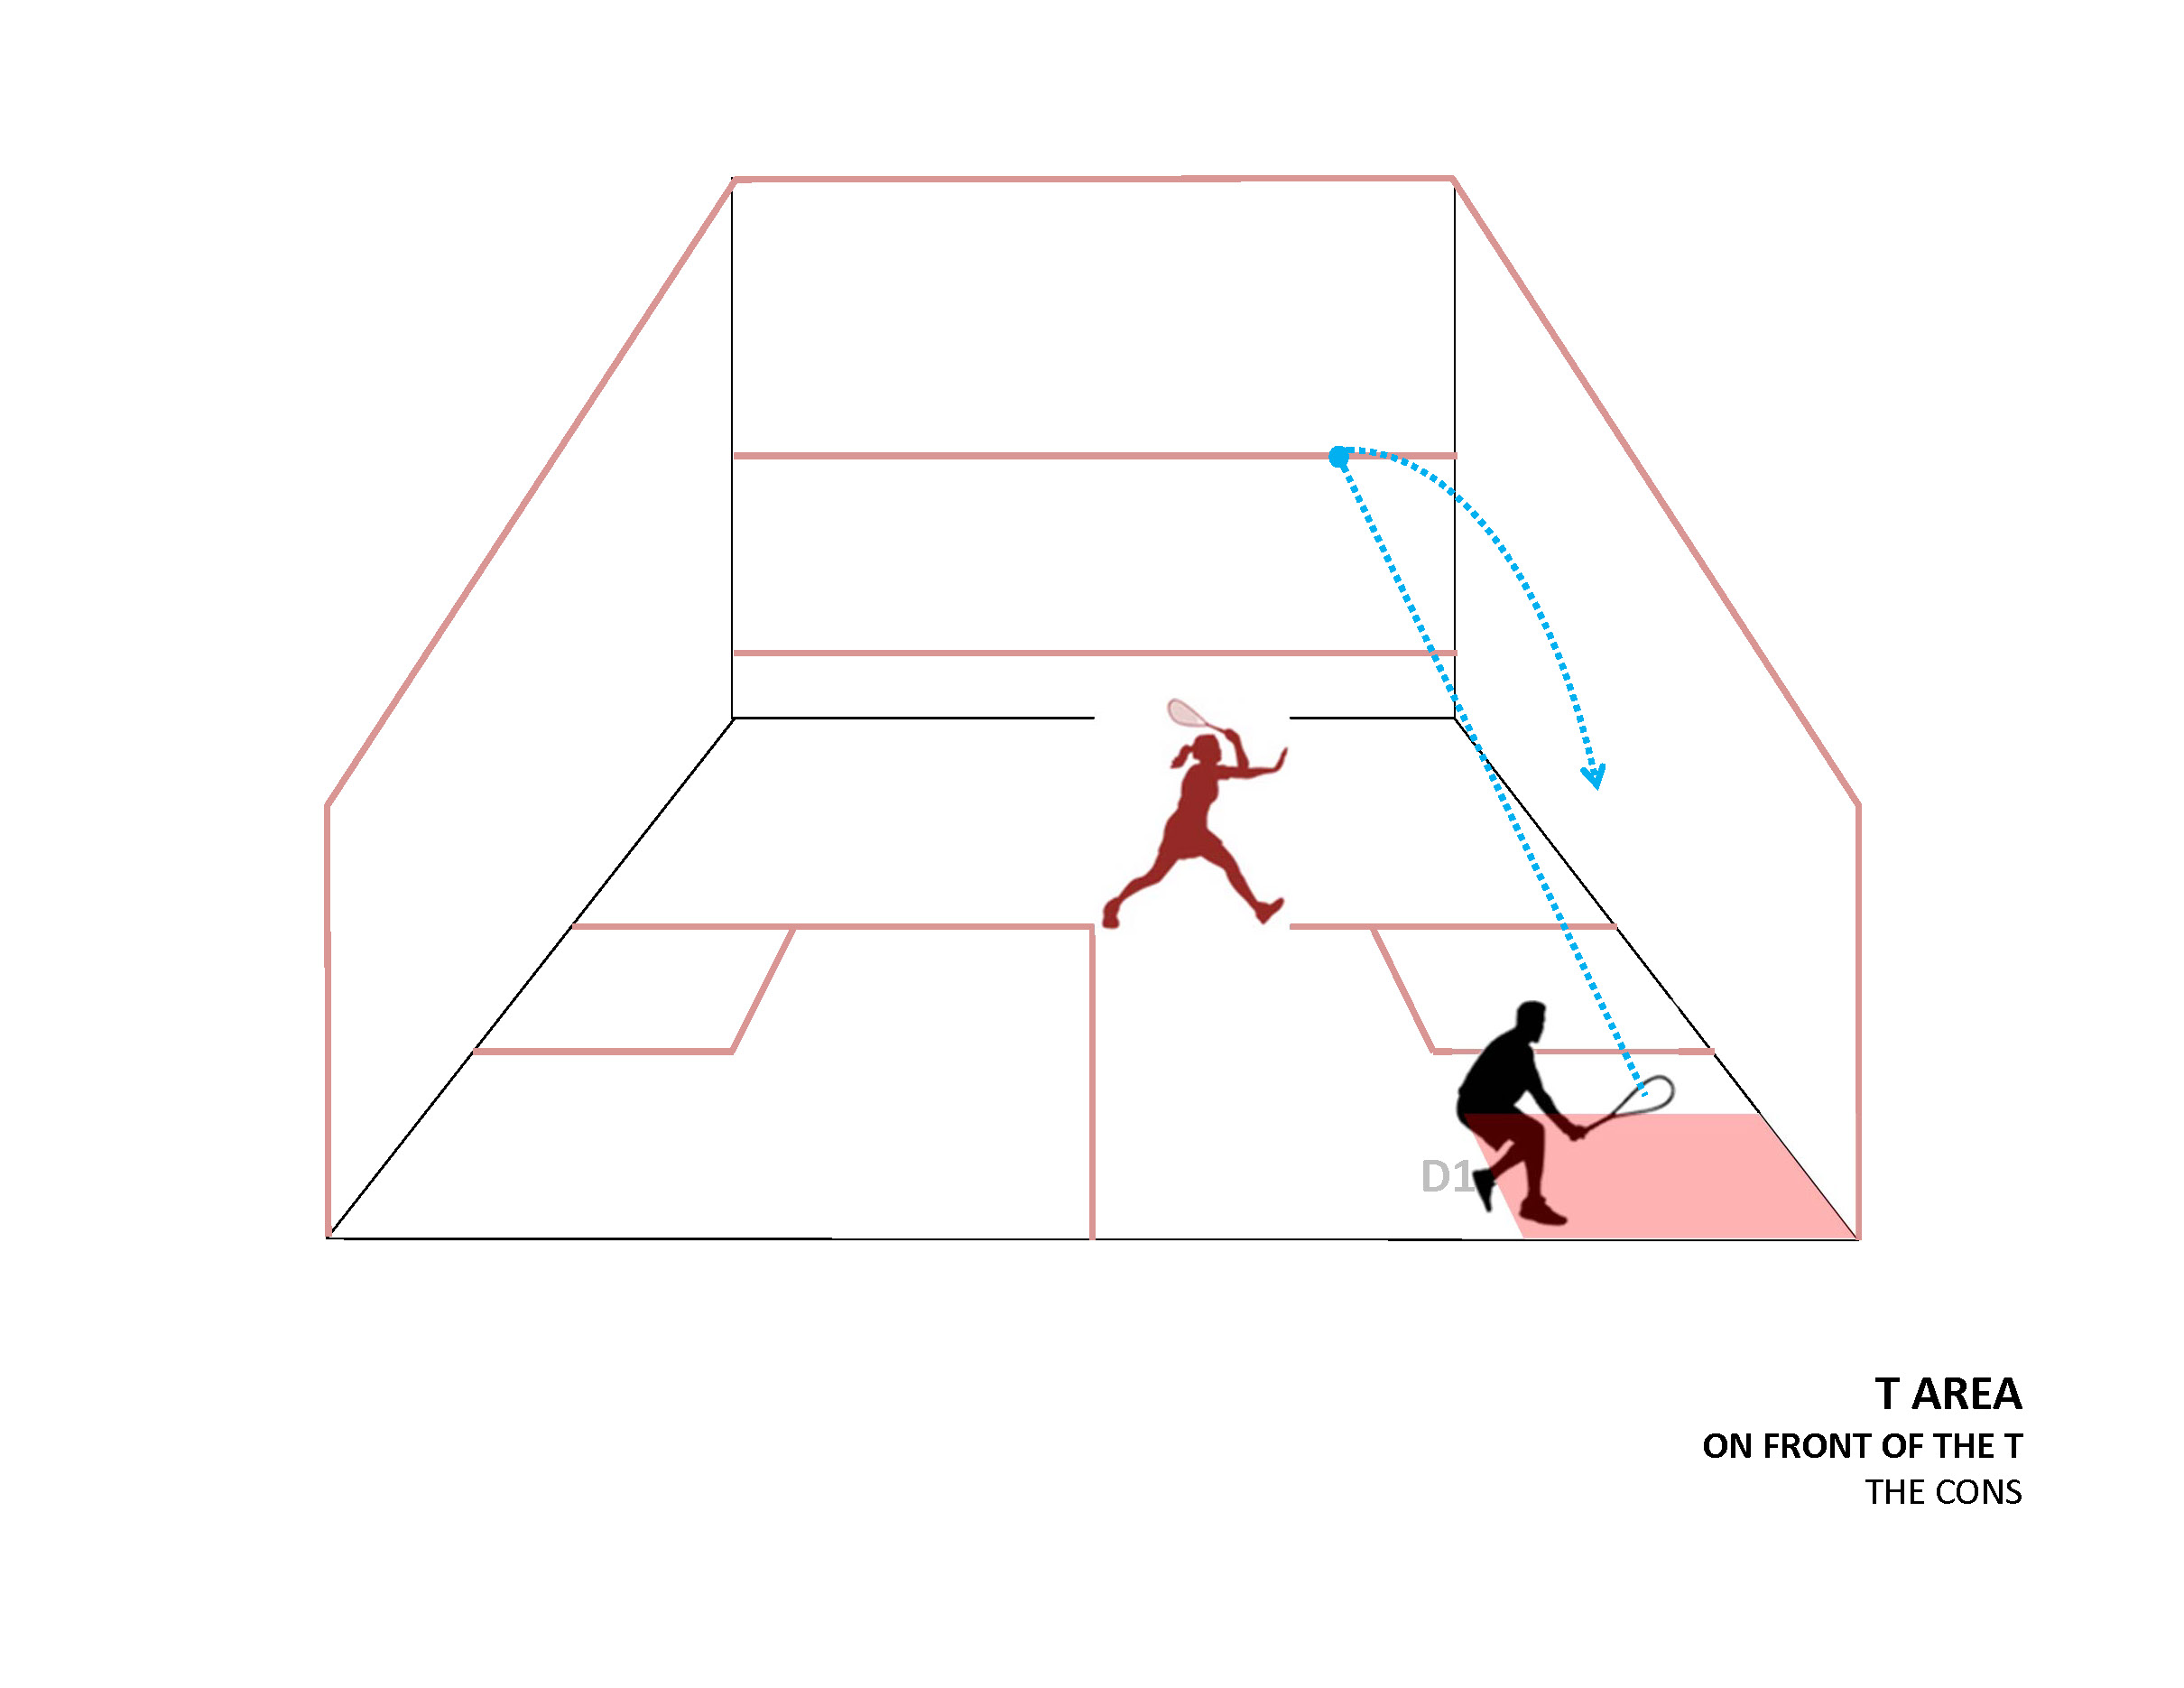
The opponent straight lobs with reasonable quality
When the opponent is positioned at the back in the D1 Zone and the player is positioned On The Front Of The T the player is unable to intercept the ball.
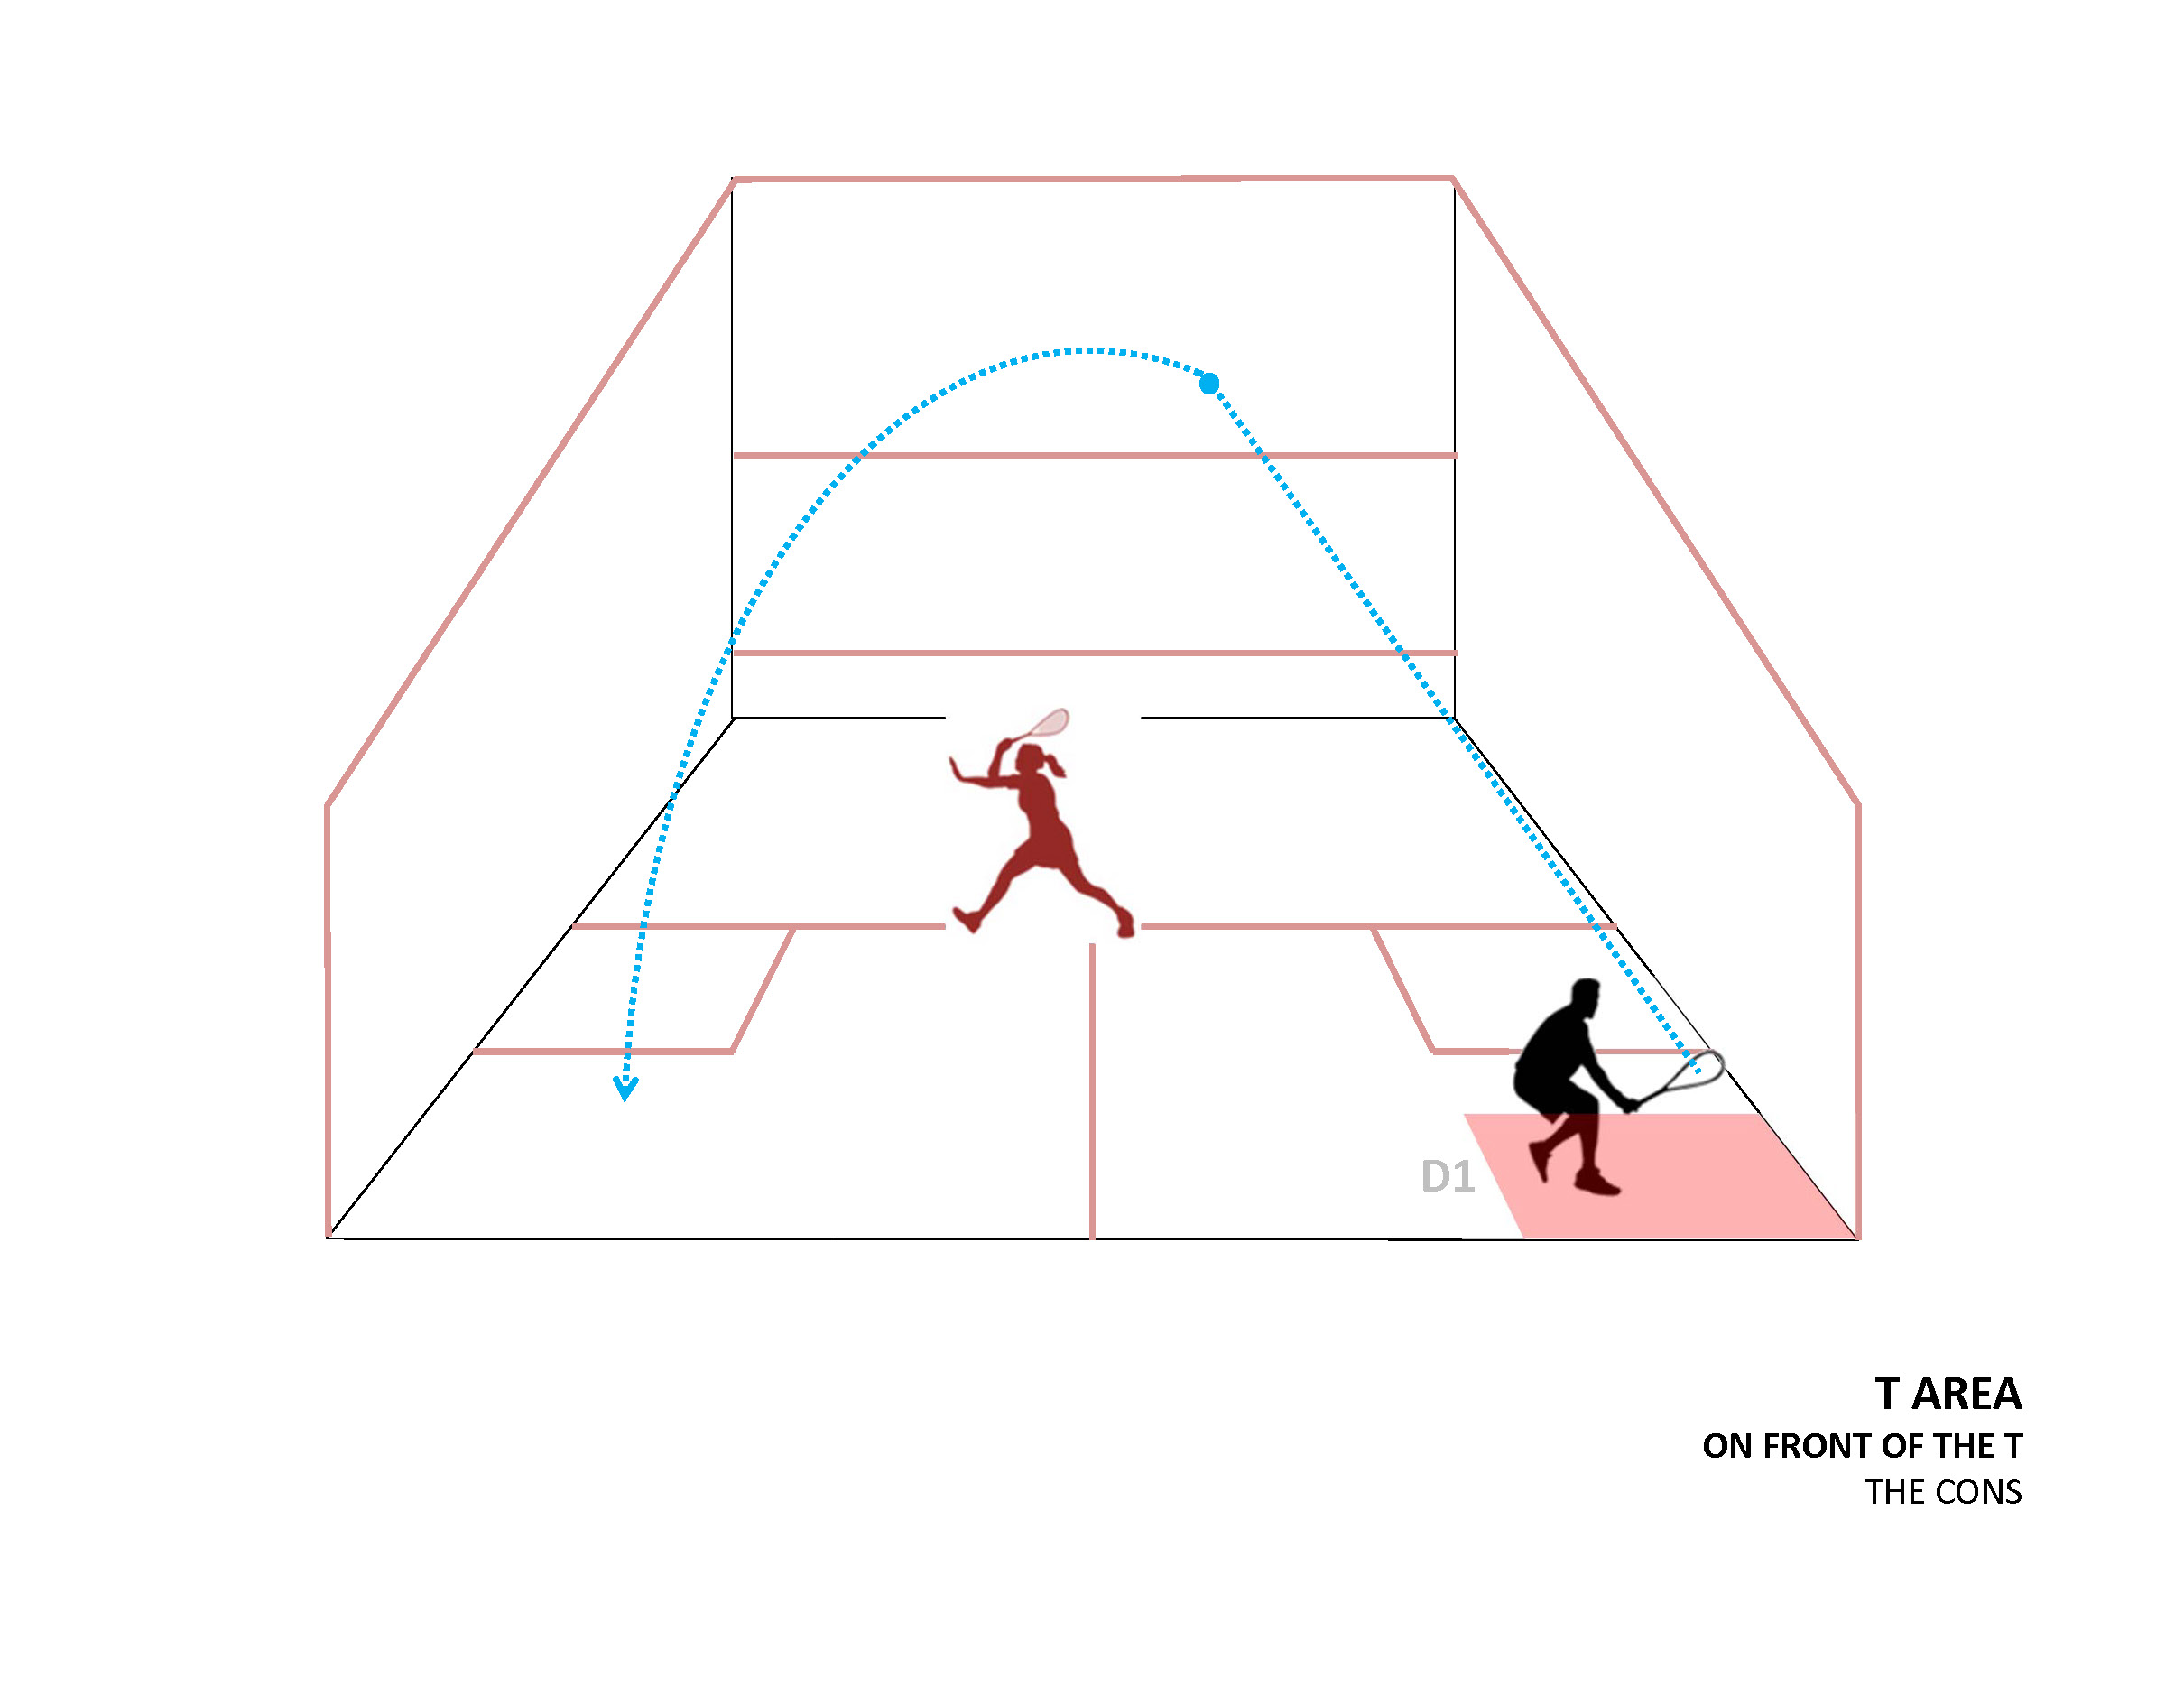
The opponent cross court lobs with reasonable quality
When the opponent is positioned at the back in the D1 Zone and the player is positioned On The Front Of The T the player is unable to intercept the ball.
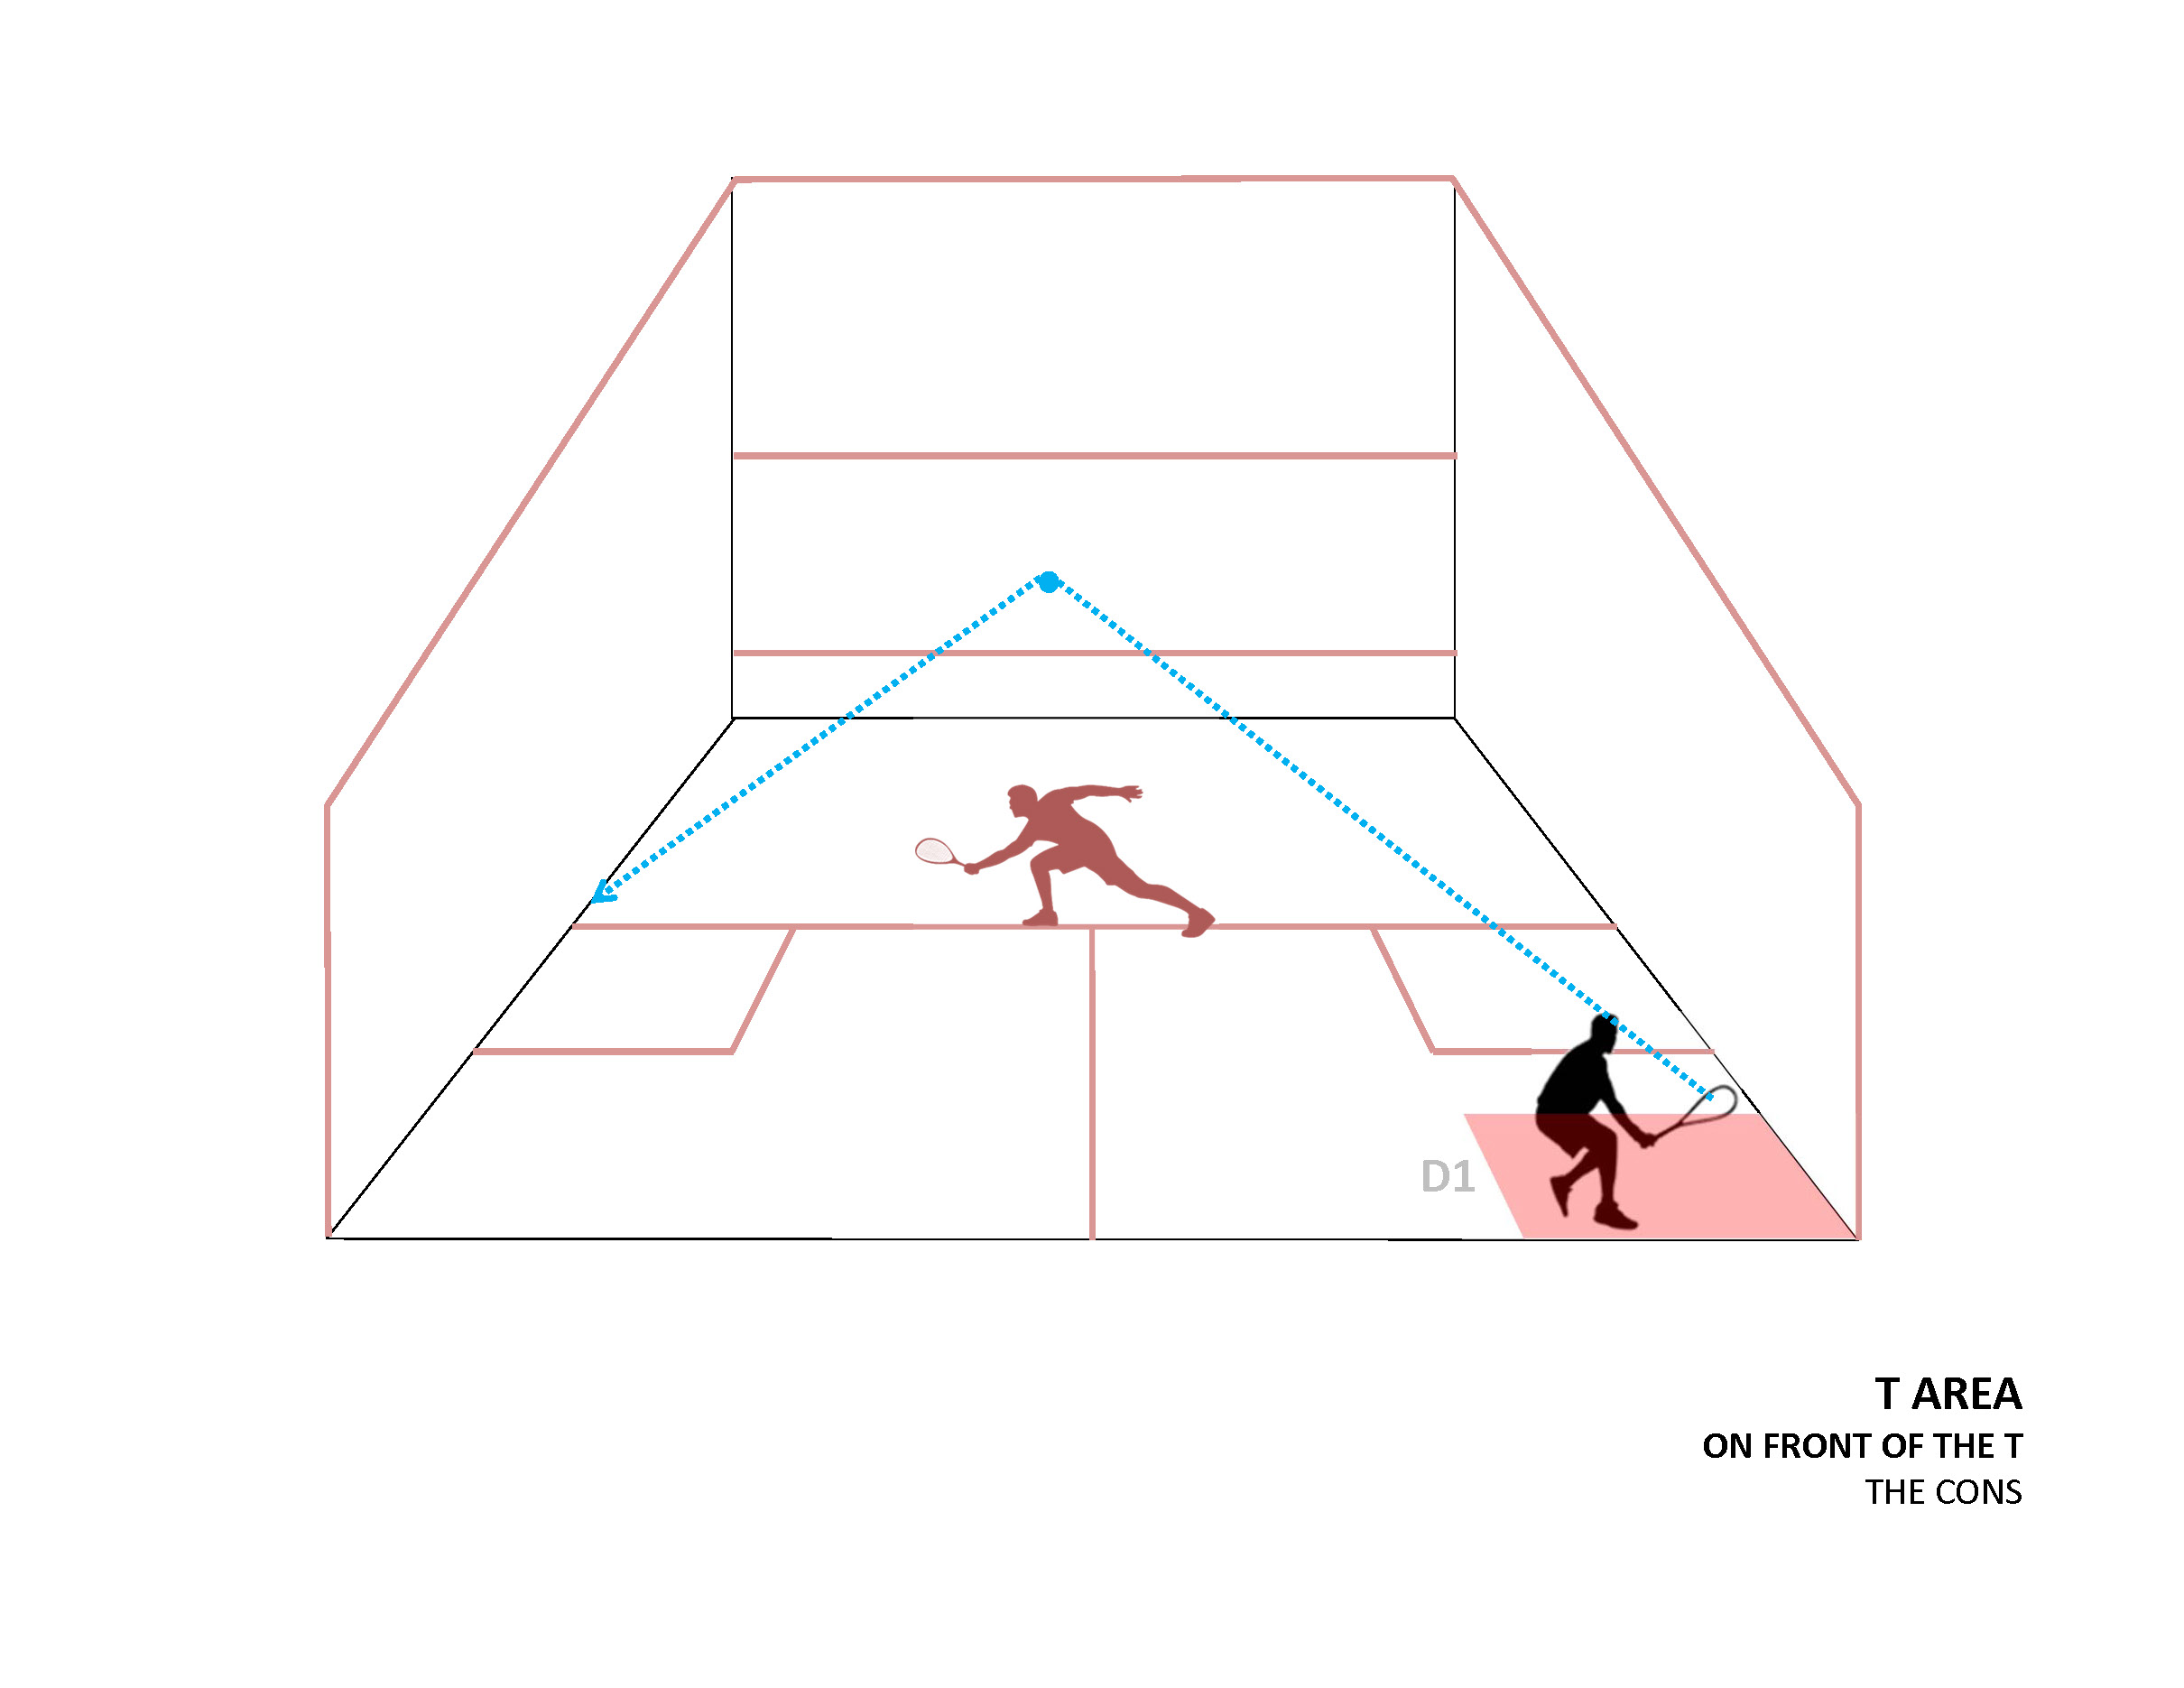
The opponent cross court drives with reasonable quality
It is interesting to note that some elite coaches encourage a high position on the T when encouraging a player to volley when an opponent is positioned in the back area.
Examples of too High on the T
Surprisingly, too high on the T (too forward) can not only discourage a player from taking the ball early but actually prevent a player from so doing. Furthermore, occasionally, instinctively the elite player repositions from the too high position to the correct positioning Back Of The T.
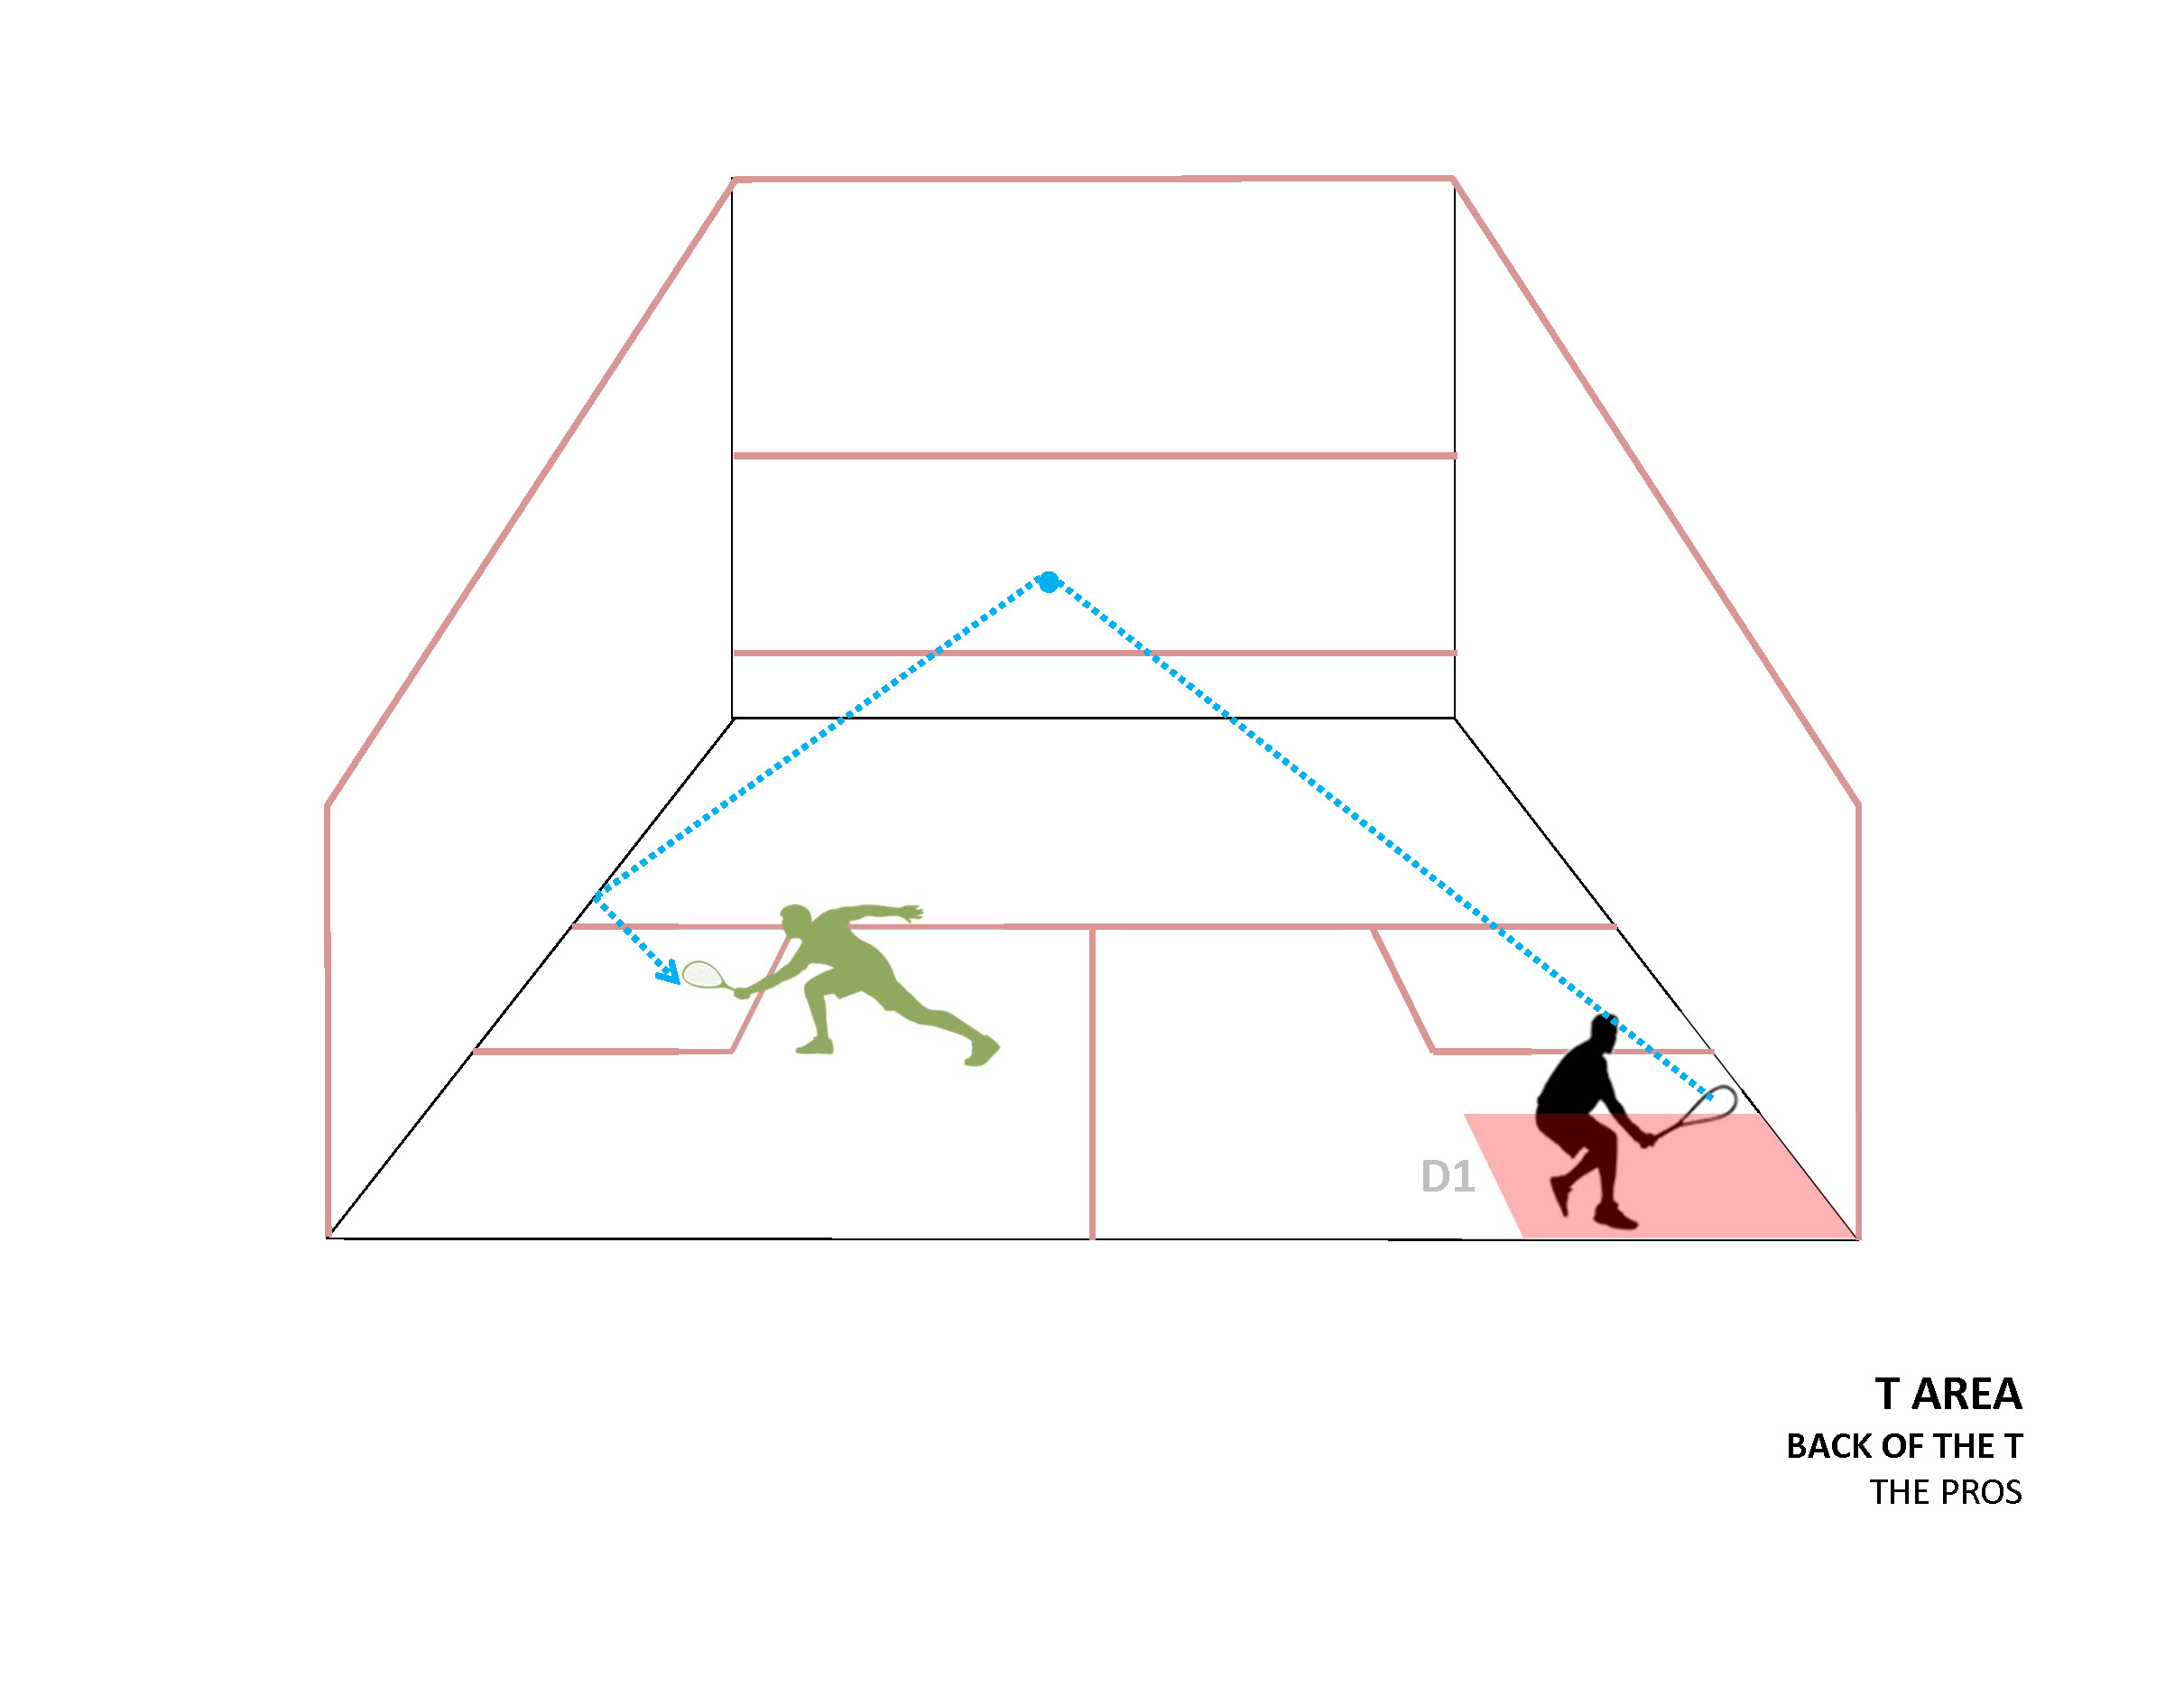
The Back Of The T - Classic Back Of The T
The Correct Positioning (Pros)
Examples
When the opponent is positioned at the back in the D1 Zone and the player is positioned on The Back Of The T (Classic Back Of The T) the player is able to intercept the ball.
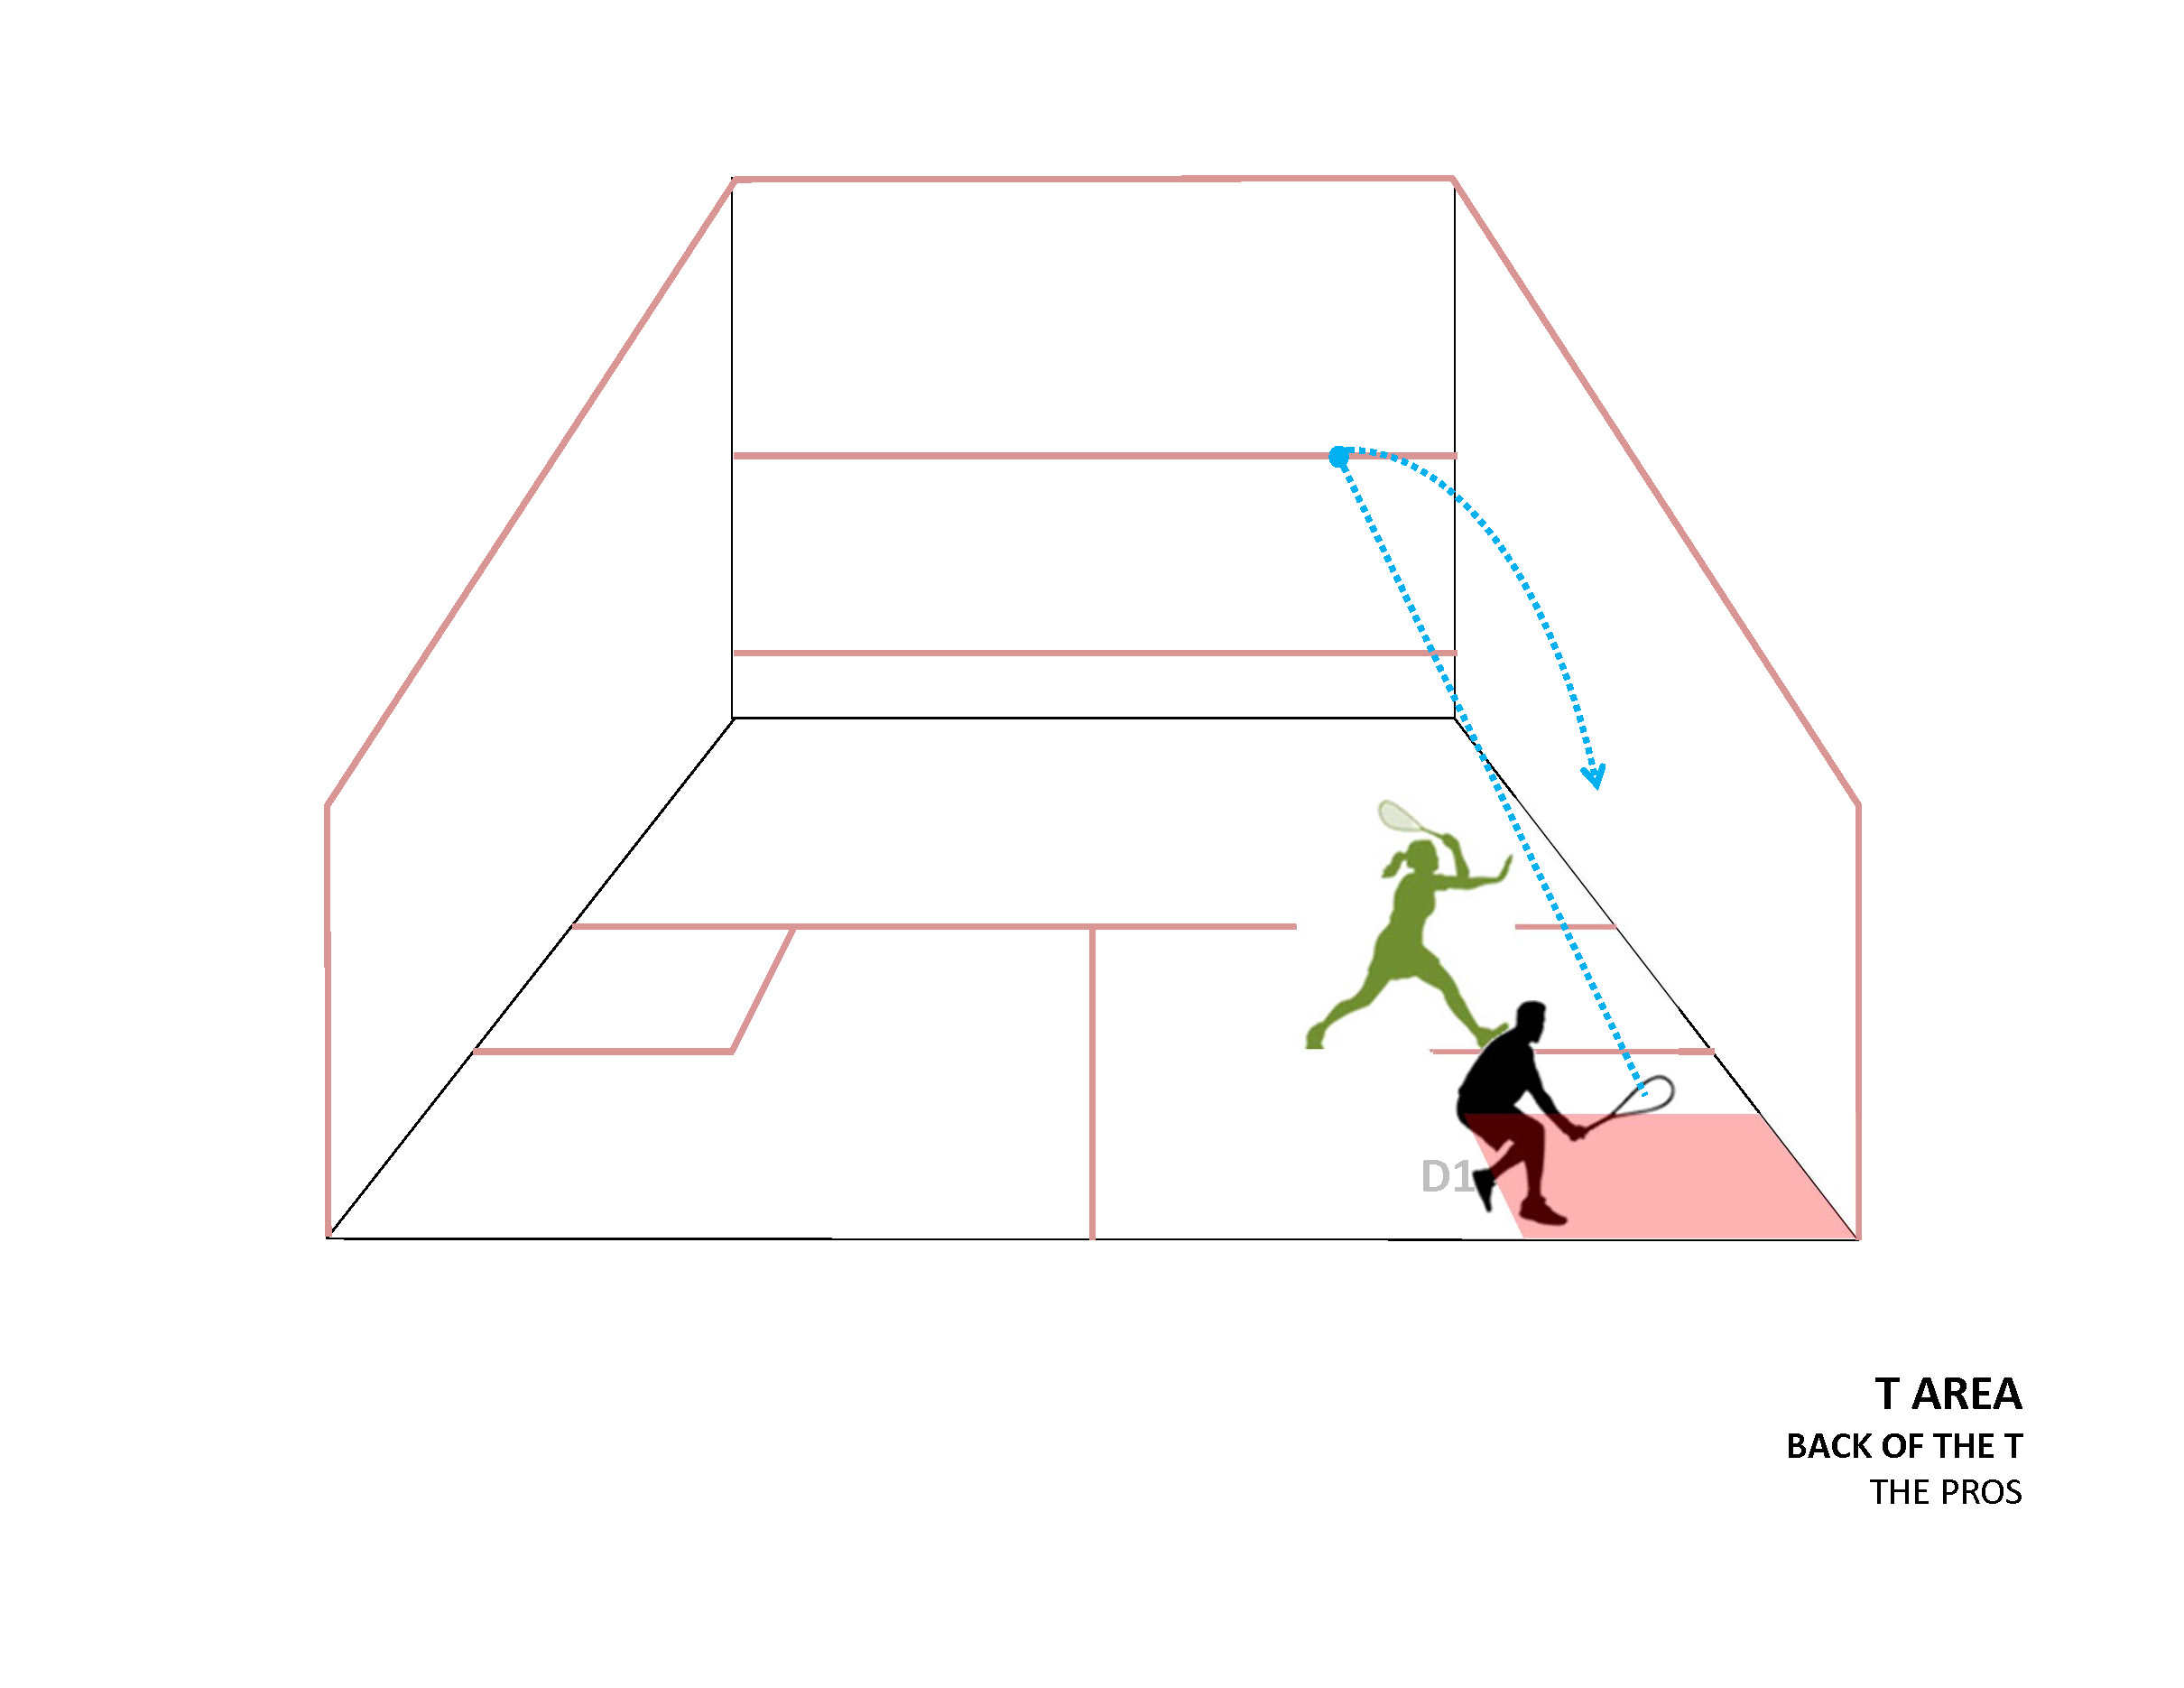
The opponent straight lobs with reasonable quality
When the opponent is positioned at the back in the D1 Zone and the player is positioned on The Back Of The T (Classic Back Of The T) the player is able to intercept the ball

The opponent cross court lobs with reasonable quality
When the opponent is positioned at the back in the D1 Zone and the player is positioned on The Back Of The T (Classic Back Of The T) the player is able to intercept the ball.
The opponent cross court drives with reasonable quality
On The Back Of The T - Classic Back Of The T
The Correct Positioning (Cons)
In relation to intercepting the ball there are no Cons but there are if the opponent boasts or straight drops. That is, the player has more distance to cover the boast and drop however, should retrieve the ball as the player has adequate time to react to the shot because the opponent is playing the shot from the back corner.
Examples
When the opponent is positioned at the back in the D1 Zone and the player is positioned on The Back Of The T (Classic Back Of The T) the player is able to retrieve the ball.
Diagram Coming.....
The opponent boasts from the D1 Zone with reasonable quality
When the opponent is positioned at the back in the D1 Zone and the player is positioned on The Back Of The T (Classic Back Of The T) the player is able to retrieve the ball.
Diagram Coming.....
The opponent straight drops from the D1 with reasonable quality
Role playing
Use role playing when teaching T positioning . Advocate not telling the player where to position but ask questions of the player which leads to a discovery or reinforces the player’s understanding. For example, when learning technique role play particular scenarios where the player provides the answer. Result……the player's technical development accelerates through understanding.
Where to position when the opponent is in The T Area?
(providing the opponent has a choice of shots)
The Correct Positioning (relevant to The T in The T Area)
Diagram coming.....
Near The Back Of The T
Where the player is positioned when the opponent is positioned in line with The Back Of The T inside The T Area. When the opponent is positioned in line with The Back Of The T inside The T Area the player is positioned slightly in front of the opponent.
When the opponent is positioned just inside the back half of the T Zone in line with The Back Of The T try to encourage a drive by being very close to and slightly in front of the opponent the rationale being that this encourages the opponent to drive the ball which is easier to retrieve than the short shot also, if the player was positioned level or behind the opponent.
Near both The Back Of The T and The Front Of The T
The Middle Of The T (the term used)
Where the player is positioned when the opponent is positioned just inside The Back Of The T inside The T Area. When the opponent is positioned just inside The Back Of The T inside The T Area the player is positioned slightly in front of the opponent.
When the opponent is positioned just inside the back half of the T Zone try to encourage a drive by being very close to and slightly in front of the opponent the rationale being that this encourages the opponent to drive the ball which is easier to retrieve than the short shot also, if the player is positioned level or behind the opponent.
Near The Front Of The T
Where the player is positioned when the opponent is positioned in line with the Middle Of The T inside The T Area. When the opponent is positioned in line with the midpoint of The T inside The T Area the player is positioned slightly in front of the opponent.
When the opponent is positioned in line with The Middle Of The T inside The T Zone try to encourage a drive by being very close to and slightly in front of the opponent the rationale being that this encourages the opponent to drive the ball which is easier to retrieve than the short shot also, if the player is positioned level or behind the opponent.
On The Front Of The T
Where the player is positioned when the opponent is positioned forward in line with Near The Front Of The T inside The T Area. When the opponent is positioned forward in line with Near The Front Of The T inside The T Area the player is positioned slightly in front of the opponent.
When the opponent is positioned extremely forward in the back half inside The T Zone try to encourage a drive by being very close to and slightly in front of the opponent. Although not ideal, the rationale being that this encourages the opponent to drive the ball which is easier to retrieve than the short shot also, if the player is positioned level or behind the opponent.
Near On The Front Of The T
Where the player is positioned when the opponent is positioned in line with On The Front Of The T inside The T Area. When the opponent is positioned in line with On The Front Of The T inside The T Area the player is positioned very close to and level with the opponent. The player is no longer positioned in front of the opponent.
When the opponent is positioned on the short line inside The T Zone try to encourage a drive by being very close to and level with the opponent. Although not ideal, the rationale being that this hopefully encourages the opponent to drive the ball which is easier to retrieve than the short shot also, if the player is positioned behind the opponent. However, if the player is positioned in front the drop is easier to retrieve but the drive may be too difficult.
Near The Front Of The T
Where the player is positioned when the opponent is positioned just inside in the front half inside The T Area. When the opponent is positioned just inside in the front half inside The T Area the player is positioned very close to and behind the opponent. The player is no longer positioned level with the opponent.
When the opponent is positioned just inside in the front half inside The T Zone try to encourage a cross - court drive by being very close to and behind the opponent. Unusually, the player is positioned further back and not even level, although not ideal, the rationale being that this allows the player to get a better view and hopefully encourage the opponent to cross - court drive the ball which is easier to retrieve than the short shot. However, if the player is positioned level the drop is easier to return but the drive will be extremely difficult. If the player is positioned in front the drop is easier to return but the drive is even more difficult.
Near On The Front Of The T
Where the player is positioned when the opponent is positioned further forward inside in the front half inside The T Area. When the opponent is positioned further forward inside in the front half inside The T Area the player is positioned very close to and behind the opponent.
When the opponent is positioned further forward inside the front half inside The T Zone try to encourage a cross - court drive by being very close to and behind the opponent. Although not ideal, the rationale being that this hopefully encourages your opponent to cross - court drive the ball which is easier to retrieve than the short shot. However, if the player is positioned level the drop is easier to return but the drive will be even more difficult. If the player is positioned in front the drop is easier to return but the drive is even more difficult
Near The Front Of The T
Where the player is positioned when the opponent is positioned extremely forward inside the front half inside The T Area. When the opponent is positioned extremely forward inside the front half inside The T Area the player positions very close to and behind the opponent.
When the opponent is positioned extremely forward inside the front half inside The T Zone try to encourage a cross - court drive by being very close to and behind the opponent. Although not ideal, the rationale being that this hopefully encourages your opponent to cross - court drive the ball which is easier to retrieve than the short shot. However, if the player is positioned level or in front the drop is easier to return but the drive if driven with reasonable quality may be unplayable.
Where does the elite player position in the T Area?
(The videos below give examples when the opponent is both in and outside the T Area. Also some of the definitions of the player's positioning relavant to The T are not as specific as the above videos. Furthermore, the videos also emphasise whether the player's shot allows time to attain the correct positioning).
Part 1
Part 2a
Part 2b
Two examples demonstrating the positives of correct positioning and negatives of incorrect positioning.
When the opponent is in the The T Area (also part of The Attacking Zone) and in front of the player, ideally, the player's correct positioning should encourage the opponent to drive Part 1
Often when the player hits a shot with less than reasonable quality the opponent retrieves the ball from the Attacking Zone. When this occurs it is even more critical that the correct T positioning is adopted by the player encouraging the opponent to drive. If the opponent plays a drop the player can also return the ball.
When the opponent is in The T Area (also part of The Attacking Zone) and in front of the player, ideally, the player's correct positioning should encourage the opponent to drive Part 2
When the player is positioned in 'no man's land' (poorly positioned) and is forced to choose 'the lesser of two evils' (correct positioning) the player's prospect of retrieving the ball is greatly increased
Copyright South Australia Squash Academy Michael Nash All Rights Reserved